# Ad summary
This ad demonstrates the Wyze Scale Ultra body composition scale that measures 13 different body composition metrics. The scale connects via bluetooth or Wi-Fi to the Wyze app, where users can track their progress and download their health reports.
# Brand positioning
Wyze is presented as a brand that democratizes technology by providing access to products usually found only in professional spaces at a fraction of the cost. The brand aims to occupy a space in the consumer's mind as an innovative company providing accessible solutions for health tracking. Wyze aims to make advanced health tracking available to a broader audience, and pushes against the norm of high prices for sophisticated health monitoring tools.
# Product
The Wyze Scale Ultra is a smart scale that analyzes body composition, providing 13 different metrics via the Wyze app. It works by inserting the included batteries, connecting the scale to the user's smartphone through the Wyze app via Bluetooth and WiFi, and then stepping on the scale with bare feet. The eight built-in electrodes measure different parts of the body individually with professional-grade precision. The app generates a PDF report that syncs to the app, giving users access to the latest software updates. The product is designed for people who want to track their health at home but don't want to pay the high cost of professional body composition scales like those used in gyms.
# Visual style
The ad features a UGC style. The editing style features quick cuts and static shots. The production quality is high, with polished commercial elements mixed with UGC-style visuals. The pacing of the ad is fast, with approximately 15 cuts per minute. The visuals are synced to the spoken messaging.
# Hooks
Spoken: 00:00–00:01 This is the Wyze Scale Ultra.
Text overlay: 00:00–00:01 / This is the Wyze ScaleUltra
Visual: 00:00–00:01 A downward shot of the black box of the Wyze Scale Ultra on the floor in front of a white door. Text overlay reads, “If you want to take control of your health in the New Year, You need this” and “This is the Wyze ScaleUltra”
# Funnel stage
Consideration
# Pain points
Expensive body composition scales found at the gym that provide metrics on one's body.
# Value propositions
- The Wyze Scale Ultra is positioned as providing similar body composition metrics of those scales found at the gym for a fraction of the price.
# Benefits
- Professional grade precision
- Measure different parts of your body individually
- Full body composition within seconds
# Features
- 13 body composition metrics
- Connects via Bluetooth and WiFi
- Eight built-in electrodes
- PDF sync to app
- Latest software updates
# Call to action
Grab this before it sells out
# Social proof
- None used.
# Point of view
- Customer 100% – The entire ad is told from the perspective of a user who is demonstrating and describing the product’s features and benefits.
# Storyline
- 00:00–00:02 The ad starts by introducing the Wyze Scale Ultra as a solution for those wanting to take control of their health in the new year.
- 00:02–00:07 The ad draws a comparison to expensive InBody scales at the gym, stating that the Wyze Scale Ultra provides the same functionality at home for a fraction of the price, creating a sense of value.
- 00:07–00:15 The ad describes the process of setting up the scale, which includes installing the included batteries and connecting to the Wyze app. The ad shows how the scale connects via bluetooth and wifi.
- 00:15–00:22 The ad demonstrates how the scale is used by stepping on it and seeing the body composition metrics, including BMI, showcased on the scale's display.
- 00:22–00:25 The ad highlights that the scale features eight built-in electrodes measure different parts of your body individually.
- 00:25–00:34 The ad explains the scale provides a full body composition that syncs to a PDF right into the app and because the scale can connect via wi-fi, you always have the latest software updates.
- 00:34–00:40 The ad ends by reiterating that if you want to take control of your health in the new year, you need this scale. The creator prompts the viewer to grab this scale before it sells out.

How Wyze Advertises on Meta
Updated Apr 19, 2026 · Refreshes weekly
Wyze runs 119 active ads on Meta, shipping ~8 new creatives per week. Their library leans on Demo34%, Screen Recording20%, and Feature Benefit Pointout7%. Recently, Wyze is heavily pushing the Solar Cam Pan ($79.98) on the strength of maintenance-free solar charging, no-subscription security, and AI tracking — with secondary pushes on the Palm Lock's palm-vein entry and the Scale Ultra's gym-quality body metrics at home. The through-line is premium tech features at a fraction of what competitors charge.
Indexed by Motion's Inspo Library.
The 20 Most Recent Wyze Ads on Meta
# Ad summary
A woman films a video demo about the Wyze Scale Ultra body scan scale, highlighting its features, ease of use with the Wyze app, and ability to track 13 metrics. The scale measures weight on its 4.3-inch screen and can measure other metrics when the user holds the handle. She states it is a great tool to have, and the scale is available on TikTok shop.
# Brand positioning
Wyze is presented as a technology brand focused on making health tracking and personal metrics easy for their customers. The brand aims to occupy a space in the consumer's mind that combines functionality with a sleek and user-friendly approach. This product's positioning is functional, emphasizing simplicity, accuracy, and integration with the Wyze app. The brand aligns with a lifestyle of monitoring and improving one's health metrics.
# Product
The Wyze Scale Ultra body scan scale is a device designed to track 13 different body composition metrics. It measures weight on a 4.3-inch screen and can measure the rest of the body composition metrics when the handle is held. The scale integrates with the Wyze app, making it easy to keep track of trends over time. Additional features include baby mode, pet mode, heart rate monitoring, and luggage mode. This scale is for anyone interested in tracking their weight and body composition metrics over time, making it easier to see trends and progress.
# Visual style
The ad has a casual, UGC-style aesthetic with quick cuts and transitions. The production quality feels like a hybrid between UGC and a polished commercial, giving it a personal touch while maintaining a professional look. The pacing is consistent and upbeat, with several cuts per minute to keep the energy high. The cuts sync with the voiceover.
# Hooks
Spoken: 00:00–00:02 Tracking your body composition metrics is so easy with this scale.
Text overlay: 00:00–00:01 YOUR BODY / 00:01–00:02 METRICS / 00:02–00:03 IS SO EASY WITH THIS
Visual: 00:00–00:02 A woman with long brown hair and a blue top holds the Wyze Scale Ultra body scan scale in front of a light-beige wall with a picture. She smiles and the camera zooms in on the scale.
# Funnel stage
Middle of funnel (Consideration)
# Pain points
The ad implies the frustration of not being able to easily track and monitor body composition metrics and trends. The woman introduces the Wyze Scale Ultra by saying, “Tracking your body composition metrics is so easy with this scale,” suggesting that without this product, tracking these metrics is difficult.
# Value propositions
- Easy to track body composition metrics with the Wyze scale
- Easy to use because it integrates with the Wyze app
- The Wyze scale is a great tool to have because it is easy to see trends over time
# Benefits
- Easy to track body composition metrics
- Easy to use
- Easy to see all trends over time
# Features
- Tracks 13 metrics
- 4.3 inch screen
- Integrates with the Wyze app
- Has baby mode, pet mode, heart rate, luggage mode
# Call to action
This scale is here on TikTok shop
# Social proof
- The ad features a woman who comes across as a credible and enthusiastic customer of the product, which can influence the viewer’s perception and build trust in the brand and product. She provides her testimonial on the features and benefits of the product.
# Point of view
- Customer 100% – The entire ad is delivered from the perspective of a woman speaking directly to the camera about her experience with the scale.
# Storyline
- 00:00–00:07 00:00–00:07 The woman shows the Wyze Scale Ultra body scan scale, stating that tracking body composition metrics is easy with the scale. She explains that this scale is going to track 13 different metrics for the user, conveying its utility and functionality.
- 00:07–00:10 00:07–00:10 The woman says that the scale integrates with the Wyze app and it is easy to use, suggesting its practicality and user-friendly design.
- 00:10–00:14 00:10–00:14 The woman steps onto the scale, which shows the weight on the 4.3-inch screen, demonstrating its ease of use and functionality.
- 00:14–00:18 00:14–00:18 The woman grabs the handle of the scale, stating the user can get the rest of the body composition metrics, highlighting the scale's comprehensive tracking capabilities.
- 00:18–00:24 00:18–00:24 A screen recording of the Wyze app on a phone is shown, and the woman states that the user can keep track of everything in the app. The woman shares that it makes it easy to see all trends over time, highlighting the scale's app integration and data-tracking capabilities.
- 00:24–00:27 00:24–00:27 The woman says no matter what the user's journey is in the moment, the scale is a great tool to have, emphasizing the scale's universal applicability and value.
- 00:27–00:31 00:27–00:31 The woman states if the viewer is ready to get it too, the scale is on the TikTok shop, prompting a call to action for viewers to purchase the product.
# Ad summary
A woman advertises a scale made by Wyze that scans your body and tracks data, including body fat, body mass, BMI, water percentage, bone mass, and metabolic age, all through an app.
# Brand positioning
Wyze is presented as a tech-forward health and wellness brand offering a scale that's more than just a scale; it's a comprehensive health monitoring tool. The brand aims to occupy the space in the consumer's mind as a provider of convenient, at-home health insights that rival professional or gym-based body scans. Wyze promotes a data-driven, proactive approach to health, aligning with a lifestyle of fitness enthusiasts who value detailed body composition analysis. By offering body scan technology in a scale, Wyze pushes against the norm of basic weight tracking, instead focusing on in-depth metrics.
# Product
The Wyze scale is a digital scale with body scan technology that tracks various health metrics beyond just weight. It's designed for individuals interested in a detailed analysis of their body composition, including body fat, body mass, BMI, water percentage, bone mass, and metabolic age. The product works by having the user stand on the scale while holding a handle, which then scans the body. It differentiates itself with automatic WiFi and app sync, eliminating the need for a phone nearby during use. The scale addresses the common misconception that weight is the only important metric, offering a digital solution for comprehensive tracking. It syncs with an app for easy tracking and analysis of the user's body metrics, emphasizing that it provides more data than a basic scale.
# Visual style
The ad has a polished UGC feel, blending a natural light setting with clear product shots. The editing style uses quick cuts to maintain a brisk pace, with visuals synced to spoken cues to emphasize key product features. The overall pacing is consistent, creating an engaging rhythm. The visual motifs include a clean, modern aesthetic with the focus on product demonstration and personal testimonial.
# Hooks
Spoken: Hey, wait.
Text overlay: !! This replaces your gym body scan !!
Visual: 00:00–00:07: From a low angle, a blonde woman sits in a woven chair with her legs toward the camera. She is wearing a light pink tank top. The background is blurry, but it looks to be a bright day with a white window and door frames and a tree outside.
# Funnel stage
Middle of funnel (Consideration)
# Pain points
The ad addresses the pain point of expensive gym body scans that could cost up to $400. The creator states, 'Now, right now my gym is actually offering that you can get your body scan done, but it's like $400 for that.'
# Value propositions
- Avoid gym fees for body scans.
- Track all of your measurements and health data via the app.
# Benefits
- Replaces your gym body scan
- Tracks all of it as well
# Features
- body scan technology
- automatic WiFi and app sync
- body fat
- body mass
- BMI
- water percentage
- bone mass
- metabolic age
# Call to action
Check this one out
# Point of view
- Customer 100% – The entire ad is told from the perspective of an enthusiastic customer reviewing the product.
# Storyline
- 00:00–00:07 A blonde woman with high cheekbones, fair skin, and pink lip gloss speaks to the camera in selfie mode.
- 00:00–00:07 She starts by saying 'Wait, wait,' then introduces a Wyze scale that has body scan technology, stating this scale 'replaces your gym body scan.' The woman's tone is energetic and excited, attempting to spark curiosity. She speaks from a customer's POV, sharing why they are excited about the product.
- 00:07–00:17 She states that while gyms offer the same scans for $400, the Wyze scale has the technology to do it for you at home. She stands by the window of her house as she explains. This builds upon the previous storyline, addressing the potential expense of gym body scans and positioning the scale as an affordable alternative. She continues from the customer's POV.
- 00:17–00:28 She says that if you're only tracking your weight, you're 'doing it wrong', as that's not the only thing that matters. She shows the digital scale and a little part that you stand up on that will take a full scan of your body. She is still presenting from a customer's POV.
- 00:28–00:41 She notes that the product has WiFi and app sync, 'so you don't even need your phone near it.' She mentions the various stats the scale tracks. This expands on the product's features and capabilities, addressing the user's concerns about data integration and ease of use. She continues with a customer's perspective.
- 00:41–00:45 She ends by saying that there is an app that tracks all of it as well and that she'll link it in here. She provides a call to action by continuing from a customer's perspective.
# Ad summary
This ad features Luke Skywalker, who is a real person with the same name as the Star Wars character. He discusses the annoyance of having the same name as a famous character and then introduces the Wyze Palm Lock as a way to use the force.
# Brand positioning
Wyze is presented as a modern, tech-forward brand that offers innovative home security solutions. The brand aims to occupy the space of accessible, high-tech convenience, aligning with a lifestyle that values ease of use and security. Wyze pushes against the norms of traditional, cumbersome security systems by offering sleek, user-friendly products. The brand positioning is functional, emphasizing simplicity and performance, while also tapping into emotional benefits like peace of mind and a sense of modern living.
# Product
The Wyze Palm Lock is a smart lock that allows users to unlock their doors using their palm. It is designed for homeowners who want a convenient and secure way to access their homes. The lock features instant unlock with your palm, the ability to unlock with your phone, create regular access and guest codes, and a mechanical lock and key. It also has a six-month battery and a two-week backup battery, as well as emergency charging. The door knows if it's open or closed so you can just shut the door, walk away, and it'll lock itself.
# Visual style
The ad has a hybrid aesthetic, blending a polished commercial feel with UGC elements. The editing style includes quick cuts and static shots, creating a dynamic yet informative viewing experience. The production quality is high, with clear lighting and sharp visuals, enhancing the product's appeal. The pacing is consistent, maintaining a steady flow of information and humor. Audio-visual sync is evident, with cuts and text timed to music beats and voiceover lines, creating a cohesive and engaging presentation.
# Hooks
Spoken: I mean like I said, with a name like Luke Skywalker, you're kind of destined to be a sci-fi dork.
Visual: 00:00–00:04: A man with glasses and a mustache stands in a room with various decorations, including a "Welcome! Everything is fine." banner, Star Wars posters, and a Tron sign. He gestures with his hands as he speaks.
# Funnel stage
Consideration
# Pain points
The ad addresses the pain point of traditional locks being inconvenient and outdated. It highlights the frustration of fumbling with keys or forgetting codes.
# Value propositions
- The Wyze Palm Lock offers a modern and convenient way to secure your home, combining advanced technology with traditional security measures.
# Benefits
- Convenient and secure way to access your home
- Versatile and secure
- Added security and peace of mind
# Features
- Instant Unlock With Your Palm
- Unlock with Your Phone
- Create Regular Access and Guest Codes
- Mechanical Lock + Key
- Up to 6 Month Battery
- 2 Week Backup Battery
- Emergency Charging
- Auto Lock
# Call to action
None used.
# Point of view
- Customer 100% – The entire ad is told from the perspective of Luke Skywalker, a customer of the brand, who shares his personal experiences and demonstrates the product's features.
# Storyline
- 00:00–00:08 The ad begins with Luke Skywalker introducing himself and acknowledging the joke that his name is the same as the Star Wars character.
- 00:08–00:12 He shows his ID to prove his name is really Luke Skywalker, setting a humorous and relatable tone.
- 00:12–00:30 Luke shares anecdotes about his parents and how his name has been a lifelong source of jokes and Star Wars-themed gifts, creating a personal connection with the audience.
- 00:34–00:41 He highlights the most annoying aspect of having his name: constantly hearing the "Luke, I am your father" line, adding a touch of self-deprecating humor.
- 00:41–00:52 Luke transitions to the product by humorously referencing the Star Wars catchphrases, setting up the reveal of the Wyze Palm Lock as a modern-day "force."
- 00:52–01:01 The ad introduces the Wyze Palm Lock with a sleek product showcase, highlighting its modern design and key features.
- 01:01–01:07 Luke demonstrates how the Wyze Palm Lock works, emphasizing the convenience of unlocking the door with just a palm, creating a sense of futuristic ease.
- 01:07–01:14 The ad showcases additional features like unlocking with a phone and creating guest codes, reinforcing the product's versatility and security.
- 01:14–01:19 The ad highlights the option to use traditional keys, catering to a broader audience and addressing potential concerns about relying solely on technology.
- 01:19–01:24 The ad details the lock's battery life, backup battery, and emergency charging capabilities, reassuring viewers about its reliability.
- 01:24–01:30 The ad emphasizes the auto-lock feature, showcasing how the door automatically locks when closed, providing added security and peace of mind.
- 01:30–01:34 Luke expresses his love for the Wyze Palm Lock, reinforcing the product's value and ease of use.
- 01:34–01:44 The ad concludes by reiterating the Star Wars theme, humorously positioning the Wyze Palm Lock as the "droid you're looking for," solidifying the product's appeal to tech-savvy and pop culture-loving consumers.
# Ad summary
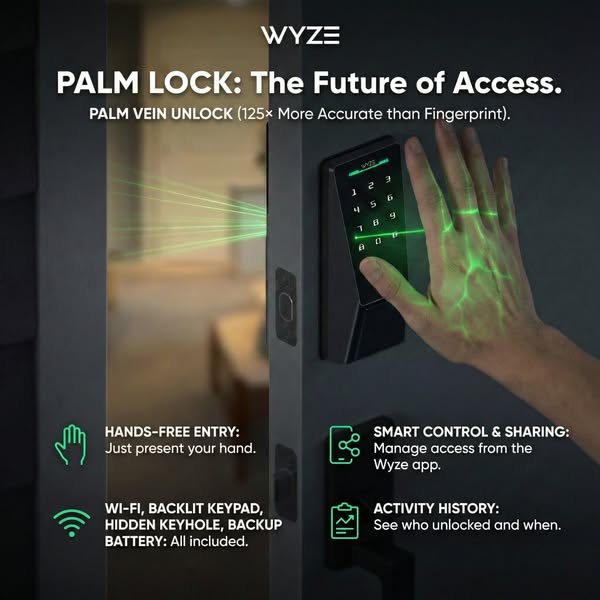
This image ad promotes the Wyze Palm Lock, highlighting its hands-free entry, smart control, activity history, and palm vein unlock feature, which is more accurate than fingerprint scanning.
# Brand positioning
Wyze is presented as a forward-thinking brand focused on innovative access solutions. The brand aims to occupy the space of providing technologically advanced and convenient home security products. Wyze aligns with values of modernity, security, and ease of use, pushing against traditional lock systems by offering a hands-free, high-tech alternative. The brand positioning is both functional, emphasizing the product's accuracy and features, and emotional, providing a sense of security and convenience.
# Product
The Wyze Palm Lock is a smart lock system that allows users to unlock their doors using palm vein recognition. It is designed for homeowners seeking a modern, secure, and convenient access solution. The lock features hands-free entry, requiring only the presentation of the user's hand. It includes Wi-Fi connectivity, a backlit keypad, a hidden keyhole, and a backup battery. A key selling point is the palm vein unlock, which is stated to be 125 times more accurate than fingerprint scanning. The lock also offers smart control and sharing via the Wyze app, as well as activity history tracking to see who unlocked the door and when. The ad addresses the purchase barrier of security concerns by highlighting the advanced and accurate palm vein technology.
# Visual style
The ad has a modern and tech-focused visual aesthetic. The production quality is highly polished, with studio-shot lighting and clean lines. The visual motifs include a focus on the product and its features, using green accents to highlight key elements. The image treatment includes background removal and color grading to create a sleek and professional look. The typography is large and bold, making it easy to read. The style is designed to be scannable and attention-grabbing in a social media feed.
# Hooks
Headline: PALM LOCK: The Future of Access.
# Funnel stage
Middle of funnel (Consideration)
# Pain points
The ad addresses the pain point of unreliable or insecure access methods. The ad states that fingerprint scanning is less accurate than palm vein unlock, implying that traditional methods may not be as secure or convenient.
# Value propositions
- Palm vein unlock provides enhanced security and accuracy compared to traditional fingerprint scanning.
- Hands-free entry offers convenience and ease of use.
- Smart control and sharing allows users to manage access remotely via the Wyze app.
- Activity history provides a log of who unlocked the door and when, enhancing security and awareness.
# Benefits
- More accurate than fingerprint
- Hands-free entry
- Smart control and sharing
- Activity history
# Features
- PALM VEIN UNLOCK (125× More Accurate than Fingerprint)
- HANDS-FREE ENTRY
- WI-FI
- BACKLIT KEYPAD
- HIDDEN KEYHOLE
- BACKUP BATTERY
- SMART CONTROL & SHARING: Manage access from the Wyze app.
- ACTIVITY HISTORY: See who unlocked and when.
# Call to action
None used.
# Social proof
- None used.
# Point of view
- Brand: The entire ad is presented from the brand's perspective, showcasing the features and benefits of the Wyze Palm Lock.
# Storyline
- The ad begins by introducing the Wyze Palm Lock and its key feature: palm vein unlock. The brand is telling the audience that this technology is the future of access, emphasizing its innovation and modernity.
- The ad highlights the accuracy of the palm vein unlock, stating it is 125 times more accurate than fingerprint scanning. The brand is emphasizing the superior security and reliability of its product compared to traditional methods.
- The ad showcases the hands-free entry feature, explaining that users only need to present their hand. The brand is highlighting the convenience and ease of use of the product, appealing to those seeking a hassle-free experience.
- The ad lists additional features such as Wi-Fi connectivity, a backlit keypad, a hidden keyhole, and a backup battery. The brand is providing a comprehensive overview of the product's capabilities, reinforcing its value and functionality.
- The ad mentions smart control and sharing via the Wyze app, as well as activity history tracking. The brand is showcasing the product's smart home integration and security features, appealing to tech-savvy users.
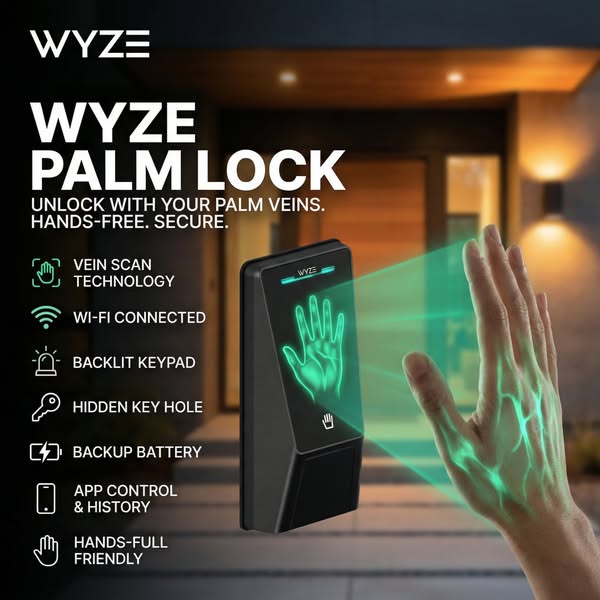
# Ad summary
This ad promotes the Wyze Palm Lock, highlighting its hands-free, secure access using palm vein technology. It emphasizes convenience, security, and modern technology.
# Brand positioning
Wyze is presented as a modern, tech-forward brand focused on home security solutions. The brand aims to occupy the space of accessible, innovative technology that simplifies and secures the home. It aligns with values of convenience, security, and cutting-edge technology, pushing against traditional lock-and-key systems. The brand positioning is both functional (security, hands-free access) and emotional (peace of mind, modern lifestyle).
# Product
The Wyze Palm Lock is a hands-free home security device that uses palm vein scanning technology for secure access. It is designed for homeowners seeking a modern, convenient, and secure way to unlock their doors. The device features vein scan technology, Wi-Fi connectivity, a backlit keypad, a hidden keyhole, a backup battery, and app control with history tracking. Its USPs include hands-free operation and enhanced security through vein scanning. The ad addresses the purchase barrier of traditional key systems by offering a more advanced and convenient alternative.
# Visual style
The ad has a modern, tech-focused aesthetic with a clean and minimalist design. The production quality is high, with studio-style lighting and sharp focus on the product. The visual motifs include a dark background with bright, glowing elements to highlight the product's features. The image treatment includes background blurring and color grading to create a sleek and sophisticated look. The typography is large and bold, enhancing scannability in the feed.
# Hooks
Headline: WYZE PALM LOCK
# Funnel stage
Middle of funnel (Consideration)
# Pain points
The ad addresses the pain point of traditional key-based systems, which can be inconvenient, insecure, and easily lost or stolen. The ad offers a more advanced and secure alternative.
# Value propositions
- Unlock with your palm veins: Offers a modern and secure way to access your home.
- Hands-free: Provides convenience and ease of use.
- Secure: Ensures enhanced security through vein scanning technology.
# Benefits
- Unlock with your palm veins
- Hands-free
- Secure
# Features
- Vein scan technology
- Wi-Fi connected
- Backlit keypad
- Hidden key hole
- Backup battery
- App control & history
- Hands-full friendly
# Call to action
None used.
# Social proof
- None used.
# Point of view
- Brand: The brand's POV is present in the product display, feature callouts, and overall messaging, aiming to inform and persuade the audience about the Wyze Palm Lock's benefits.
- Customer: The customer's POV is represented by the hand interacting with the device, demonstrating the ease and convenience of the hands-free unlocking process.
# Storyline
- The ad opens by showcasing the Wyze Palm Lock and its brand name, immediately establishing the product and brand being promoted. This is from the brand's perspective, aiming to capture attention and introduce the product.
- The ad highlights the key features of the Wyze Palm Lock, such as vein scan technology, Wi-Fi connectivity, and app control. This is from the brand's perspective, educating the audience about the product's capabilities and benefits.
- The ad visually demonstrates the hands-free unlocking process with a hand being scanned by the device. This is from the customer's perspective, showing the ease and convenience of using the product.
- The ad emphasizes the security and convenience of the Wyze Palm Lock, reinforcing its value proposition. This is from the brand's perspective, aiming to persuade the audience to consider the product as a solution to their security needs.
# Ad summary
A male creator reviews the EZVIZ smart home security camera. He highlights the features of the camera, including that it's wire-free, it detects and tracks people as they move, it has zoom, and there's no monthly membership fee. He also says that installation is easy, and it comes with a solar panel so it stays charged off sunlight. Features include two-way talk, a spotlight, a siren, night vision, and full-color night video. He also suggests avoiding subscriptions completely by adding a micro SD card.
# Brand positioning
EZVIZ is presented as a brand offering accessible, user-friendly smart home security solutions that prioritize convenience and affordability. The emphasis on wire-free installation, solar power, and no monthly fees positions EZVIZ as a practical alternative to traditional security systems. The brand appears to target consumers seeking easy-to-install and maintenance-free options without the recurring costs associated with many competitors. EZVIZ aims to occupy a space in the market that offers both functional security features and simple operation, appealing to those who value straightforward solutions.
# Product
The EZVIZ security camera is a wire-free, rotating smart home security solution designed for easy installation and use. It features motion detection and tracking, zoom capability, two-way talk, a spotlight, a siren, night vision, and full-color night video. The camera is equipped with a solar panel for continuous charging via sunlight, eliminating the need for power cables or frequent battery replacements. Users can choose to store recordings locally via a micro SD card, avoiding monthly subscription fees. Installation requires only mounting the camera with two screws, making it a simple process. The camera caters to homeowners looking for hassle-free, comprehensive home security that can be monitored directly from their phone, providing both convenience and control.
# Visual style
The ad has a clean and modern aesthetic, with clear shots of the product and its features. The lighting is natural, showcasing the camera in an outdoor setting. The editing is straightforward with static shots and smooth transitions. The video maintains a UGC feel with its handheld camera work and minimal post-production effects, adding a layer of authenticity. The pacing is moderate, with cuts timed to match the voiceover, enhancing the audio-visual sync and maintaining viewer engagement.
# Hooks
Spoken: 00:00–00:01 I'm honestly really impressed with this camera.
Text overlay: 00:00–00:02 I'M HONESTLY REALLY
Visual: 00:00–00:07 A close-up shot of the white EZVIZ security camera attached to the corner of a beige-colored house. The camera is mounted under a small solar panel. The camera slowly rotates.
# Funnel stage
Consideration
# Pain points
Many security systems require extensive wiring, which can be a hassle for homeowners. The ad highlights: "If you want a simple security setup without the wiring headache..."
# Value propositions
- The solar panel and SD card slot enables a customer to skip fees.
# Benefits
- No monthly membership fee just to use it
- Installation is ridiculously easy
- No drilling holes through walls
- No running power cables
- Stays charged off sunlight
- Stores recordings locally, and you can watch everything right from your phone
- A simple security setup without the wiring headache
# Features
- Wire-free
- Rotates in every direction
- Detects and tracks people as they move
- Zoom
- Comes with a solar panel
- Two-way talk
- A spotlight
- A siren
- Night vision
- Full-color night video
# Call to action
None used.
# Social proof
- I'm honestly really impressed with this camera.
# Point of view
- Customer 100% – The entire ad is communicated from the perspective of a customer sharing his experience with the product.
# Storyline
- 00:00–00:01 00:00–00:01 The man expresses that he's impressed with the camera.
- 00:01–00:07 00:01–00:07 The ad highlights the features of the camera, including that it's wire-free, it rotates in every direction, and it detects and tracks people as they move. It is delivered from the brand's POV to highlight key features.
- 00:07–00:11 00:07–00:11 The narrator goes on to note that the camera has zoom, which he says is more useful than he expected.
- 00:11–00:16 00:11–00:16 The narrator claims that the best part is that you don't have to pay a monthly membership fee just to use it.
- 00:16–00:21 00:16–00:21 The ad shows how installation is very easy by just picking a spot, putting in two screws, and mounting it.
- 00:22–00:26 00:22–00:26 The narrator explains that there is no drilling holes through walls or running power cables.
- 00:26–00:39 00:26–00:39 The narrator notes that it also comes with a solar panel, and the cable is long enough that you can mount the camera where it makes sense and put the solar panel somewhere safe or sunnier so it can keep the battery topped off.
- 00:39–00:42 00:39–00:42 The narrator tells viewers that once the camera is set up, it kind of just runs.
- 00:42–00:48 00:42–00:48 The ad highlights the additional features of the camera, including two-way talk, a spotlight, a siren, night vision, and full-color night video.
- 00:48–00:56 00:48–00:56 The ad tells viewers that if they want to avoid subscriptions completely, they can just pop in a micro SD card and watch everything right from their phone.
- 00:56–01:02 00:56–01:02 The narrator recommends the product for people who want a simple security set up without the wiring headache.
# Ad summary
The ad features a man showcasing the WYZE solar powered cam pan security camera. He highlights its features, including easy setup, 360-degree monitoring, 2K resolution, tracking, night vision, and waterproof capabilities. The ad emphasizes its ease of installation and the availability of a subscription for advanced tracking and memory access, while also noting that 24/7 tracking and alerts are accessible without a subscription. The presenter encourages viewers to purchase the camera for their home or business via a provided link.
# Brand positioning
WYZE is positioned as a provider of user-friendly, high-tech security solutions. The brand emphasizes practicality and ease of use, aiming to simplify home security for the average consumer. By focusing on features like solar power, easy installation, and comprehensive monitoring, WYZE aims to occupy a space in the market where advanced technology is accessible and convenient, setting itself apart from brands that may require more complex setup or professional installation. The brand's focus is on functional benefits, making it a practical choice for customers seeking reliable and straightforward security solutions.
# Product
The WYZE solar-powered cam pan security camera is a wireless outdoor surveillance device designed for ease of use and comprehensive monitoring. The camera features a solar panel for continuous power, 360-degree monitoring, 2K resolution for clear imaging, tracking capabilities to follow movement, night vision for low-light conditions, and waterproof construction for durability. It includes a 3-foot cable to connect the solar panel separately. The camera is easily installed with just two screws and provides notifications via an app whenever it detects activity. A subscription service is available for advanced tracking and extended memory access, though 24/7 tracking and alerts are available without it.
# Visual style
The ad has a UGC feel, with simple edits and a straightforward presentation. The production quality is basic, and the visual motif is presenter-focused to support a casual tone and build audience trust.
# Hooks
Spoken: 00:00–00:04 So this is Wyze's solar powered cam pan security camera.
Text overlay: 00:00–00:01 SO THIS / 00:01–00:02 SOLAR-POWERED / 00:02–00:03 CAM / 00:03–00:04 CAMERA.
Visual: 00:00–00:01 The presenter peels off the protective film from the front of the security camera. The camera is white and square-shaped, and he is holding it at eye level. The background is cluttered with tools and random items, suggesting a garage or workshop setting. / 00:01–00:04 The man holds the camera up for the camera. It is a white, cube-shaped security camera with a small solar panel attached to the top. The background is a cluttered garage or workshop setting with tools, camping equipment, and random items on shelves and walls. The lighting is somewhat dim. The camera pans up and down with the product.
# Funnel stage
Middle of funnel (Consideration)
# Pain points
Setting up security can be difficult: "This thing is so easy to set up as well as install."
# Value propositions
- Continuous, eco-friendly power through solar charging
- Enhanced surveillance with 360-degree coverage, 2K resolution, and reliable tracking
- Weatherproof, durable design suitable for any outdoor environment
# Benefits
- Easy to set up and install
- Can connect solar panel separately
- Will still get a week's worth of battery life even with snow
- Advanced tracking
- More access to older memory
# Features
- Solar powered
- Cam pan security camera
- 360 degree monitoring
- 2K resolution
- Tracking
- Night vision
- Waterproof
- Three foot long cable
- Notification to the app
- Wifi connection
- Subscription available
- 24/7 tracking and alerts
# Call to action
If you guys want to get one of these for your home or your business, I'll put a link right here so that way you can.
# Social proof
- "Wyze took their best selling solar security camera and upgraded it."
# Point of view
- Customer 100% – The entire ad is presented from the perspective of a creator reviewing the product.
# Storyline
- 00:00–00:01 The presenter begins by peeling off a protective film from the camera lens.
- 00:01–00:04 He introduces it as WYZE's solar-powered cam pan security camera. This opens the product demo with a direct statement of its core functionality.
- 00:04–00:07 The presenter notes it is an upgrade from their best-selling solar security camera. The purpose is to imply trust through the line of successful products.
- 00:07–00:17 He highlights the ease of setup and installation, then lists features like 360-degree monitoring, 2K resolution, tracking, night vision, and waterproof capabilities. This builds on the previous statement that this camera is simple and reliable.
- 00:17–00:27 The presenter describes the 3-foot cable for separate solar panel connection, emphasizing continued battery life even with snow coverage. This reinforces its practicality, reliability, and installation flexibility.
- 00:27–00:34 The presenter continues to describe the easy installation process and emphasizing that the camera has 360-degree tracking.
- 00:32–00:38 A split-screen displays a sample of the tracking feature.
- 00:38–00:47 The presenter notes that the camera is solar-powered and can hook up to a wi-fi connection. He recommends that it is installed on a garage, a wall, a tree, whatever works for the consumer.
- 00:47–00:59 He explains the subscription for advanced tracking and memory, noting basic features are still accessible without it. He notes that WYZE is running really good deals on these security cameras for the new year.
- 00:59–01:02 The presenter ends with a call to action and tells the user to click the link. This ends with a specific call to action tied to an offer.
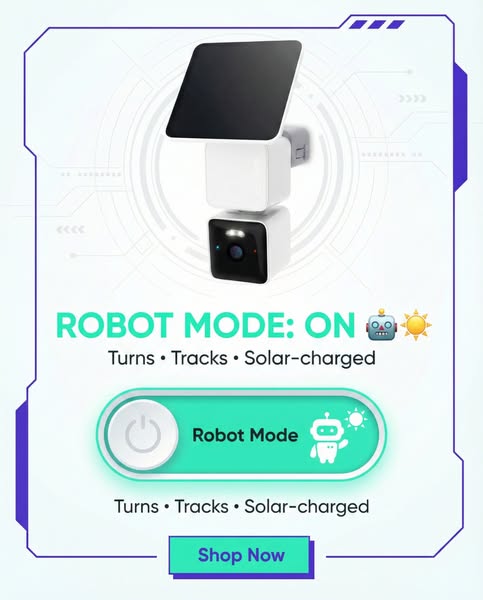
# Ad summary
This image ad showcases a white security camera with a solar panel, emphasizing its robot mode feature that allows the camera to turn, track, and be solar-charged. The ad uses a futuristic design and simple layout.
# Brand positioning
The brand is presented as innovative and tech-forward, emphasizing advanced features and modern design. The brand aims to occupy the space of smart home security solutions. It promotes a lifestyle of convenience and enhanced security through technology, aligning with values of automation and environmental consciousness with its solar-charging feature. The brand pushes against the norm of traditional, static security cameras by offering a device that actively turns and tracks, providing broader coverage and enhanced functionality. Its positioning is both functional (turns, tracks, solar-charged) and lifestyle-based (modern, smart security).
# Product
The featured product is a white, modular security camera system equipped with a solar panel. The camera consists of two stacked cube-shaped modules, one containing the camera lens and the other presumably housing the control system. Atop the camera is a rectangular solar panel for charging. The camera is designed to turn and track, providing a wider range of surveillance. It is solar-charged, eliminating the need for manual charging and promoting energy efficiency. The 'Robot Mode' is highlighted as a key feature. The product is targeted at those seeking a modern, convenient, and eco-friendly home security solution. The ad addresses the purchase barrier of continuous power supply by emphasizing its solar-charging capability.
# Visual style
The ad has a modern, tech-forward visual aesthetic with a clean and simple layout. It features a high-quality product shot on a bright white background with soft lighting. The image treatment includes subtle tech-inspired graphics in light blue, creating a futuristic feel. The typography is clean and legible, contributing to the overall sleek design. This style aims for scannability in-feed by presenting the product and key features clearly and concisely.
# Hooks
Headline: ROBOT MODE: ON 🤖☀️
# Funnel stage
Middle of funnel (Consideration)
# Pain points
The ad implicitly addresses the potential inconvenience and environmental impact of traditional security cameras that require manual charging and offer limited coverage. The frustration is that consumers need a security solution that is both effective and sustainable, without being too intrusive to maintain.
# Value propositions
- Automated security with Robot Mode
- Turns and tracks for more comprehensive coverage
- Solar-charged, eliminating the need for manual charging and promoting energy efficiency
# Benefits
- Automated security
- Convenient
- Eco-friendly
# Features
- Turns
- Tracks
- Solar-charged
- Robot Mode
# Call to action
Shop Now
# Social proof
- None used.
# Point of view
- Brand: The entire ad communicates the brand's message and positioning, promoting its innovative security camera and highlighting its key features.
- Customer: The ad is designed to appeal to the customer by showcasing a product that offers convenience, advanced technology, and eco-friendly features.
# Storyline
- The ad opens by highlighting the product itself—a security camera with a solar panel—against a futuristic background. This is designed to immediately capture attention and introduce the innovative nature of the product. The brand is showing what it's promoting, starting with the physical device.
- The ad emphasizes that 'ROBOT MODE: ON' along with the features 'Turns • Tracks • Solar-charged.' This builds excitement and highlights the smart, automated functionality of the camera. The brand is telling the audience about a specific feature that makes the product unique and valuable.
- The ad includes a button-style graphic labeled 'Robot Mode,' visually reinforcing the key feature. This is intended to be interactive, drawing the viewer in and making them consider the ease of use. The brand is guiding the customer through the product’s core functionality.
- The ad closes with another mention of the key features: 'Turns • Tracks • Solar-charged', and a 'Shop Now' button, encouraging immediate action. This reinforces the benefits and pushes for conversion. The brand is prompting the customer to make a purchase decision.
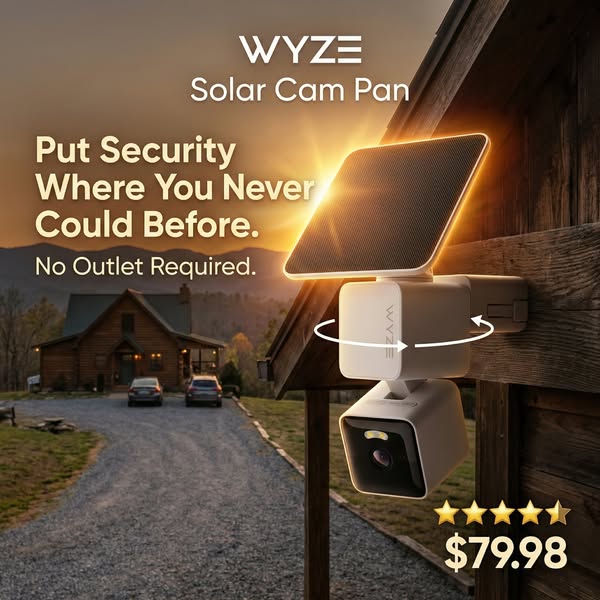
# Ad summary
This image ad for Wyze's Solar Cam Pan features the product mounted outside of a log cabin. The ad emphasizes the product's wireless feature, since it doesn't require an outlet, and highlights the current sale price.
# Brand positioning
Wyze is presented as an innovator in the home security space, specifically focusing on accessibility. The brand highlights the convenience and flexibility afforded to homeowners through their products, which feature ease of installation and wireless operation. Their products are presented as an accessible way to stay protected and monitor one's property, especially in areas where electrical outlets are not readily available.
# Product
The Wyze Solar Cam Pan is a wireless outdoor security camera that provides homeowners a way to monitor their property without the need for electrical outlets. The camera features a solar panel on top, allowing it to function wirelessly and be installed in various outdoor locations. The camera is designed to withstand outdoor conditions while maintaining high-quality video recording, with pan and tilt functionality to cover a wide area. It allows homeowners to have greater control over their home's security and peace of mind knowing they can monitor their property from anywhere.
# Visual style
The ad features a high-quality, studio-shot aesthetic with a focus on showcasing the product in a realistic outdoor setting. The image is well-lit, with a warm color grade that enhances the natural tones of the log cabin and surrounding landscape. The typography is clean and legible, with strategic use of bold text to emphasize key selling points. The overall visual style aims to convey a sense of reliability and innovation.
# Hooks
Headline: Put Security Where You Never Could Before.
# Funnel stage
Middle of funnel (Consideration)
# Pain points
The ad addresses the problem of limited placement options for security cameras due to the need for a power outlet. "Put Security Where You Never Could Before."
# Value propositions
- Wireless security
- Solar powered security camera
# Benefits
- Put Security Where You Never Could Before.
# Features
- No Outlet Required.
# Call to action
None used.
# Social proof
- ⭐⭐⭐⭐⭐
# Point of view
- Brand, throughout the ad: The ad promotes the features and benefits of the Wyze Solar Cam Pan from the brand's perspective, emphasizing its key selling points and value proposition to potential customers.
# Storyline
- The ad opens by showcasing the Wyze Solar Cam Pan's most compelling feature: its ability to provide security in locations that lack traditional power outlets. This is conveyed from the brand's POV, directly addressing a common limitation of conventional security systems and highlighting the product's innovative solution for versatile installation.
- Next, the ad reinforces the utility of the Solar Cam Pan by showing it mounted on a home exterior. The brand uses this to visually confirm the camera's seamless integration into real-world scenarios, particularly in settings where easy access to electricity might be limited, such as a log cabin in a remote area.
- The ad concludes by shifting the focus to the product's price point. From the brand's POV, this information serves to lower the barrier to entry and underscore the accessibility of advanced home security, appealing to budget-conscious consumers seeking comprehensive coverage.
# Ad summary
A man in an outdoor setting shows off the features of a new wireless Wise security camera that is mounted to a tree.
# Brand positioning
Wise is presented as an innovator in home security, offering advanced features and convenience. The brand seeks to occupy a space in the consumer's mind as an innovator in the home security market by being the first to offer a wireless pan-and-scan camera with a solar panel. Wise aligns with a lifestyle that values easy installation, security, and environmental consciousness, as demonstrated through the wireless and solar-powered features. The brand pushes against the norms of wired security systems that require professional installation by offering an easy, DIY, wireless alternative. The brand positioning is functional, emphasizing performance, convenience, and ease of use.
# Product
The product being advertised is Wise's first wireless pan-and-scan security camera. It features the ability to rotate 360 degrees horizontally and 70 degrees vertically and can be mounted without any wires. The camera comes with a solar panel and a 10-foot cable, which allows for flexible placement to maximize sun exposure. The camera records in 2K quality and has 2K color night vision, ensuring clear footage at all times. It also includes an integrated spotlight, which allows for better visibility in low-light conditions. It runs 24/7 by charging throughout the day and using that power at night. The ad highlights that this product is new and likely to sell out quickly, creating a sense of urgency to purchase.
# Visual style
The ad has a casual, UGC feel, with natural lighting and outdoor settings. The editing style includes quick cuts and static shots. The video uses a combination of close-up product shots and wider shots to show the camera's placement and functionality. The cuts per minute are moderate, with a consistent pace throughout the ad. The audio is synced with the visual content as the man demonstrates and explains the product features.
# Hooks
Spoken: Right here is Wise's first wireless pan-pan camera, which means that it can rotate 360 degrees.
Text overlay: RIGHT HERE IS / FIRST / PAN-PAN / DEGREES / WHICH MEANS THAT IT
Visual: 00:00–00:03 A man's hand gestures toward a white security camera attached to a tree. The camera is a cube shape with a solar panel on top. The background shows a clear blue sky with some green trees.
# Funnel stage
Middle of funnel (Consideration)
# Pain points
The ad addresses the pain point of complicated, wired security systems that require professional installation. The man emphasizes that there are no wires and that he was able to install it himself.
# Value propositions
- The wireless feature and solar panel mean convenient, eco-friendly security without the need for professional installation or wired power.
- The 2K quality, color night vision, and integrated spotlight ensure reliable, high-quality surveillance in all conditions.
# Benefits
- No wires needed
- Flexible placement with 10-foot cable
- Clear footage at all times
- Better visibility in low-light conditions
- Runs 24/7
# Features
- First wireless pan-and-scan camera
- Rotates 360 degrees horizontally and 70 degrees vertically
- Comes with a solar panel and a 10-foot cable
- Records in 2K quality
- 2K color night vision
- Integrated spotlight
# Call to action
None used.
# Social proof
- None used.
# Point of view
- Customer 100% – The entire video is presented from the perspective of a customer sharing his experience with the product.
# Storyline
- 00:00–00:03 The man introduces the Wise camera as the first wireless pan-and-scan camera.
- 00:03–00:08 He highlights the camera's ability to rotate 360 degrees horizontally and 70 degrees vertically, emphasizing its range of coverage.
- 00:08–00:12 The man explains that the camera is wireless and mounted in the middle of his backyard in a tree.
- 00:12–00:19 He mentions the solar panel and 10-foot cable, explaining that it can be tilted or placed in different locations to maximize sun exposure.
- 00:19–00:24 The man mentions that the camera records in 2K quality with color night vision and has an integrated spotlight.
- 00:24–00:29 He shares that the camera runs 24/7 because the solar panel charges the camera throughout the day and then the camera uses that power at night.
- 00:29–00:36 He creates a sense of urgency by mentioning that this is a new product and that he doesn't see them staying in stock for long.
# Ad summary
This ad showcases the Wyze brand solar powered cordless security camera. The man in the video demonstrates how the camera is solar powered, has a wide lens, night vision, and spotlight. The camera takes approximately 10 minutes to install, and Wyze gives you all the hardware and instructions to mount it. It has a motion-tracking sensor to make sure you won't have any more blind spots on your property. If your camera is mounted in a place that doesn't get a lot of sunlight, you can take the solar panel off and mount it somewhere else.
# Brand positioning
Wyze positions itself as an accessible home security and automation brand, offering a range of affordable, user-friendly products that bring peace of mind to everyday consumers. They aim to make advanced technology accessible to everyone, simplifying home monitoring without complex setups or expensive subscriptions. Wyze stands out by providing cost-effective, feature-rich solutions that challenge traditional security systems, promoting a sense of empowerment and control over one's living space.
# Product
The advertised product is the Wyze solar-powered cordless security camera designed for easy home monitoring. It features a wide-angle lens, night vision, and a built-in spotlight to capture clear footage day or night. The camera is powered by a "generous" solar panel, eliminating the need for frequent battery changes or external power. It is also equipped with a motion-tracking sensor that minimizes blind spots. A long-lasting battery is included. Wyze provides all the necessary hardware and instructions for easy DIY installation in approximately 10 minutes. The product eliminates the need for subscriptions, offering a one-time purchase solution for comprehensive home security. In addition, the solar panel may be moved from the camera and mounted separately.
# Visual style
The ad has a casual, UGC-style aesthetic with natural lighting and handheld camera work, suggesting authenticity and user-friendliness. The editing rhythm is moderate, with cuts timed to the speaker's points and visual cues. The production quality is decent, balancing a polished look with a down-to-earth feel.
# Hooks
Spoken: Male 1: No more prescription needed to be able to save your security camera footage.
Text overlay: 00:00–00:45 / SOLAR POWERED CAMERA ☀️ 📹 / NO MORE / SUBSCRIPTION / NEEDED TO BE ABLE TO / SAVE YOUR SECURITY / FOOTAGE.
Visual: 00:00–00:07 A hand rotates a white Wyze security camera mounted on a brick wall, with a solar panel on top. The background includes blurred trees and a house across the street.
# Funnel stage
Middle of funnel (Consideration)
# Pain points
The ad addresses the pain point of subscription costs for security camera footage, highlighting that with this camera, "no more prescription needed to be able to save your security camera footage."
# Value propositions
- Eliminating the need for subscriptions by providing a solar-powered camera with long-lasting battery.
- Easy DIY installation in about 10 minutes with all necessary hardware and instructions included.
# Benefits
- Save your security camera footage.
- No more blind spots on your property.
# Features
- Solar-powered
- Cordless
- Wide lens
- Night vision camera
- Spotlight
- Motion-tracking sensor
- Large long-lasting battery
# Call to action
I'm gonna leave a direct link right here down below.
# Social proof
- "They've already sold out one time" – Male 1 (Customer)
# Point of view
- Customer 100% – The entire video is told from the perspective of a person reviewing the product for an audience.
# Storyline
- 00:00–00:07 The ad begins with a close-up shot of the Wyze solar-powered security camera mounted on a brick wall. The camera is highlighted as a cost-effective solution, eliminating the need for subscriptions and providing comprehensive security footage.
- 00:07–00:11 The camera's features are presented, including its wide lens, night vision, and spotlight, showcasing its comprehensive monitoring capabilities.
- 00:11–00:16 The solar panel is introduced as a feature, highlighting its generous size and capability to charge a long-lasting battery, emphasizing the product's energy efficiency and convenience.
- 00:16–00:22 The ease of installation is emphasized, with the ad mentioning that it takes about 10 minutes to install and that Wyze provides all the necessary hardware and instructions for easy DIY setup.
- 00:22–00:27 The camera's motion-tracking sensor is highlighted as a key feature, ensuring no more blind spots on the property, thus reinforcing the product's effectiveness in complete home surveillance. This builds on the previous moment by detailing the value of the product after the ease of installation is addressed.
- 00:27–00:33 The ad addresses mounting flexibility, explaining that the solar panel can be detached and mounted separately if the camera is placed in an area with limited sunlight.
- 00:33–00:45 The ad concludes with a call to action, highlighting the discounted price and urging viewers to grab one before they sell out again, reinforcing the brand's value proposition and creating a sense of urgency.
# Ad summary
An influencer promotes a Wyze Solar Cam, touting its easy setup, solar power, 360° rotation, spotlight, and AI tracking features. He highlights its high quality and subscription-free use, while also warning about potential stock shortages, encouraging viewers to act fast.
# Brand positioning
Wyze is presented as a provider of high-quality security cameras. The brand is positioned as offering innovative solutions by incorporating features like solar power, AI person tracking, and flexible mounting options. Wyze focuses on user-friendly design and affordability, emphasizing ease of use and no mandatory subscription fees. The brand aligns with a lifestyle that prioritizes home security with a modern, tech-forward approach.
# Product
The advertised product is the Wyze Solar Cam Pan Tilt, a wireless outdoor security camera designed for easy installation and comprehensive surveillance. Key features include a quick-connect mount, full solar power (eliminating the need for batteries or hardwiring), 360-degree rotation, and 70-degree tilt. The camera also includes a spotlight and AI person tracking for enhanced monitoring. The product offers high-quality live view accessible via smartphone, with manual remote rotation or automatic AI-driven tracking. Wyze is available without a subscription.
# Visual style
The ad has a casual, UGC-style aesthetic with bright, natural lighting. Editing involves straightforward cuts between shots of the presenter and the product, maintaining a consistent focus on clarity and information. The production quality suggests a home environment, lending a relatable feel to the content. Pacing is moderate, with cuts timed to key points in the voiceover, enhancing the connection between audio and visual elements.
# Hooks
Spoken: Male 1: Quick connect mount, fully solar powered, 360 rotation, and 70 degree tilt?
Text overlay: 00:00–00:01 quick / 00:01–00:02 fully / 00:02–00:03 fully SOLAR powered, / 00:03–00:04 360 rotation, / 00:04–00:05 and 70 degree tilt?
Visual: 00:00–00:02 A young man with fair skin is holding a white Wyze security camera with a solar panel attachment. The camera is attached to a white mounting apparatus with a white wire coiled around it. The man is wearing a brown t-shirt with a camouflage YETI logo, and a duck hunting hat. The background features a white wall, a white door, and a shelf with various items. / 00:02–00:05 Close up shot of the camera as he describes the product.
# Funnel stage
Middle of funnel (Consideration)
# Pain points
The main pain point is the hassle of dealing with traditional security cameras that require frequent battery changes or complex hardwiring, making setup and maintenance inconvenient.
# Value propositions
- The Wyze Solar Cam provides a high-quality, easy-to-use security solution with the convenience of solar power, eliminating the need for batteries or hardwiring.
- The camera can be used with or without a subscription.
# Benefits
- No subscription required
- No more batteries or hardwiring
- Can be mounted somewhere else that's perfectly in the sun
- Ain't missing anything
- Automatically follow
# Features
- Quick connect mount
- Fully solar powered
- 360 rotation
- 70 degree tilt
- Spotlight
- AI person tracking
- High-quality camera
- Live view from phone
- Manual rotation from phone
# Call to action
I'll drop that link down below, if it's still there, you can still pick one up.
# Social proof
- "This is the camera I want right here." – Male 1 (Customer)
- "This is hands down the best security camera you can get." – Male 1 (Customer)
- "It's from Wyze, so you know it's high quality." – Male 1 (Customer)
# Point of view
- Customer 100% – The entire ad is presented from the perspective of a seemingly satisfied user who is enthusiastic and directly addressing the audience.
# Storyline
- 00:00–00:07 The influencer presents the Wyze Solar Cam, highlighting its key features.
- 00:07–00:15 The influencer shares the name of the product and reiterates how the product doesn't require a subscription.
- 00:15–00:24 The influencer displays the solar panel and says there are no more batteries or hardwiring required and shows how the product mounts to the solar panel directly, or with a long cable.
- 00:24–00:28 The influencer highlights the high quality and rotating capabilities of the camera.
- 00:28–00:34 The influencer highlights how you can view live from your phone.
- 00:34–00:46 The influencer wraps up by saying if you're interested in getting a high quality camera, this is the way to go, and it may be hard to keep in stock, so act fast.
# Ad summary
This video is a detailed installation guide for the WYZE Solar Cam Pan outdoor security camera. It begins by introducing the product and explaining optimal placement for field of view and detection range, including recommended height and tilt angles. The ad then emphasizes the importance of sufficient direct sunlight for the solar panel and visually demonstrates unsuitable installation locations to avoid. It proceeds to show two mounting options: first, attaching the solar panel directly to the camera, detailing the assembly of the bracket, cable management, and plugging in the solar cable; second, installing the camera and solar panel separately, again demonstrating the individual mounting of each unit and their connection. The video concludes by highlighting the benefit of "maintenance-free solar charging" and promotes the product's availability on TikTok Shop.
# Brand positioning
The ad presents WYZE as a provider of practical, user-friendly smart home security solutions. The brand aims to occupy a space in the consumer's mind as an accessible and efficient option for outdoor surveillance, emphasizing ease of installation and maintenance-free operation with solar power. The tone is instructional and helpful, suggesting reliability and simplicity. The brand appears to follow the norm of offering security products but distinguishes itself by highlighting the "maintenance-free solar charging" aspect as a key benefit, pushing against the pain point of battery replacement or wired power. The positioning is functional, focusing on performance, convenience, and direct sunlight utilization.
# Product
The product featured is the WYZE Solar Cam Pan, an outdoor security camera system that includes a camera unit and a detachable solar panel for power. The ad demonstrates two installation options: mounting the solar panel directly onto the camera, or mounting them separately. The product is for homeowners or individuals seeking outdoor surveillance with an emphasis on continuous, maintenance-free operation. Key features highlighted are: Optimal installation height: 7-10 feet high. Optimal camera tilt: 30 degrees downward. Solar panel requires sufficient direct sunlight exposure, avoiding eaves or tree branches for efficient charging. If installed separately, the camera should be no more than 10 feet away from the solar panel. The camera and solar panel connect via a cable. Includes a cable organizer on the back of the solar panel. Installation involves drilling holes (1/4 inch drill bit), inserting wall anchors, and screwing the bracket to the wall. The camera slides onto the bracket until it clicks. The solar panel's angle can be adjusted to ensure direct sunlight. The ad emphasizes the "maintenance-free solar charging" as a unique selling proposition, suggesting the product provides continuous surveillance without the need for manual battery changes or power cables.
# Visual style
The ad features a polished commercial visual style with clear, direct shots. The editing rhythm is moderate, featuring smooth cuts that transition between product shots, hands-on demonstrations, and outdoor installation examples. The production quality is high-end, aiming for a professional and trustworthy feel, which supports the instructional and informative tone. Visual motifs include consistent close-ups on the product and hands during assembly, as well as clear, well-lit outdoor shots demonstrating placement. The pacing is consistent throughout the instructional segments, with cuts occurring to match the voiceover's narrative progression. There is clear audio-visual sync where text overlays appear precisely with the spoken words, and visual demonstrations match the voiceover instructions.
# Hooks
Spoken: Welcome to the installation guide for Wyze Solar Cam Pan.
Text overlay: WELCOME TO THE / INSTALLATION GUIDE / Solar Cam Pan Installation Guide (title overlay) / FOR WYZE SOLAR / CAM PAN
Visual: Medium shot, eye-level, of the white WYZE Solar Cam Pan camera unit with a small solar panel attached to its top, mounted on a light brown horizontal wood-paneled wall. The camera has a black lens and a small red indicator light. The solar panel is black with a white frame. The camera is slightly tilted downward. Stationary tripod shot. / High-angle, overhead shot of a suburban street and driveway. A person (obscured face, dark clothing) walks a small black dog on a leash on the asphalt driveway of a light green house with white trim and a two-car garage. Green grass is on either side of the driveway. Clear sky. Stationary tripod shot.
# Funnel stage
Consideration
# Pain points
The ad implies the pain point of needing to constantly check or maintain a security camera's power source, whether through battery changes or wired connections. It also implicitly addresses the frustration of poor camera performance due to incorrect installation, by providing precise guidance for optimal field of view and detection range.
# Value propositions
- Ensuring the camera is installed correctly maximizes its field of view and detection range.
- Proper solar panel placement and angle ensure it receives direct sunlight, which leads to efficient charging.
- Maintenance-free solar charging provides continuous operation without user intervention.
# Benefits
- Best field of view
- Best detection range
- Ensures efficient charging
- Maintenance-free solar charging
# Features
- Installs outdoors
- Recommended height: 7 to 10 feet high
- Recommended tilt: 30 degrees downwards
- Solar panel requires sufficient direct sunlight
- Avoid installation under an eve or tree branches
- If installed separately, camera no more than 10 feet away from solar panel
- Cable organizer on solar panel
- Charging port on the back of the camera
- Uses 1/4 inch drill bit
- Uses wall anchors
# Call to action
NOW AVAILABLE ON TIKTOK SHOP
# Point of view
- Brand 100% – The entire video is presented as an instructional guide from the official brand, with a voiceover providing direct instructions and demonstrations of product installation and features.
# Storyline
- 00:00–00:03 The video opens with a shot of the WYZE Solar Cam Pan installed on a wooden wall. The male voiceover introduces the video as an "installation guide" for the product, setting an instructional and helpful tone. The audience is invited into a practical demonstration from the brand's perspective.
- 00:03–00:05 A wide shot from an overhead perspective shows a person walking a dog on a driveway, with a house in the background. This establishes the context of outdoor surveillance and what the camera is designed to monitor, demonstrating its intended application in a home setting. The voiceover explains the importance of installation for "the best field of view."
- 00:05–00:07 A person walks with a suitcase on a paved path in front of a house, framed by a green bounding box. This visually reinforces the idea of "detection range," showcasing the camera's ability to monitor activity around a home. The voiceover continues explaining the importance of "detection range."
- 00:07–00:10 The camera system is shown installed under an eave, with an animated ruler graphic illustrating the recommended 7-10 feet height. This provides clear, precise instructions for optimal placement, directly addressing practical installation concerns from the brand's expert perspective.
- 00:10–00:13 The camera system is again shown installed, and an animated protractor graphic appears, showing a 30-degree downward tilt. This continues the detailed installation guidance, providing specific technical advice for optimal camera performance.
- 00:13–00:19 The camera system is shown on a wooden wall, with the voiceover emphasizing proper solar panel placement to receive direct sunlight. This highlights a critical functional requirement for the solar panel's efficiency, preemptively addressing potential user issues. The animated visual shows a tree branch partially obscuring the panel, which transitions into an X-mark over the camera.
- 00:19–00:29 The video displays scenarios to avoid for solar panel installation, such as under an eave or tree branches, illustrating how these conditions would limit sun exposure. An animated red 'X' appears over the camera in these unsuitable locations. This reinforces the importance of direct sunlight for charging efficiency, preventing user frustration.
- 00:29–00:37 The camera and solar panel are shown separately on a wall. The voiceover explains that if installed separately, the camera should be no more than 10 feet from the solar panel. This provides a specific technical constraint for separate installations, ensuring connectivity and function.
- 00:37–00:44 The video transitions to a close-up of a person's hands demonstrating how to mount the solar panel directly onto the camera, showing the back of the camera unit and the solar panel. The voiceover introduces the first of two mounting methods, guiding the user through a hands-on demonstration.
- 00:44–00:50 The hands secure the solar panel bracket to the top of the camera using short mounting screws. This is a step-by-step instructional sequence, demonstrating a precise action.
- 00:50–00:52 The hands tighten the ball knob on the bracket. This continues the practical assembly demonstration.
- 00:52–00:57 The hands attach the solar panel to the bracket. This completes the physical assembly of the camera and panel unit for the first mounting option.
- 00:57–01:03 The hands wrap excess cable around the cable organizer on the back of the solar panel. This demonstrates cable management, promoting a neat and functional installation.
- 01:03–01:09 The hands plug the solar panel cable into the charging port on the back of the camera. This connects the power source to the camera, completing the unit's electrical setup.
- 01:09–01:12 A hand holds up a white card with "Wall Mounting" instructions and an arrow indicating the camera's orientation. This introduces the next phase of physical installation (mounting the assembled unit), from the brand's instructional perspective.
- 01:12–01:14 A hand uses a drill to make holes in a concrete-like wall surface, using the bracket as a guide. This shows the initial step of preparing the mounting surface.
- 01:14–01:17 A close-up of a hand using a drill bit, followed by a hand holding a wall anchor. This further details the drilling process and introduces the use of anchors for secure mounting.
- 01:17–01:21 A hand inserts a wall anchor, then uses a drill to secure the bracket onto the wall. This demonstrates the secure attachment of the mounting bracket.
- 01:21–01:26 A hand slides the camera onto the mounted bracket until it clicks. This completes the physical installation of the camera system onto the wall.
- 01:26–01:31 A hand adjusts the angle of the solar panel to ensure direct sunlight. This emphasizes the final adjustment for optimal solar charging, reinforcing a key product benefit.
- 01:31–01:36 The camera and solar panel are shown installed under an eave, separated, introducing the second installation option. The voiceover states this option involves installing them separately, providing an alternative.
- 01:36–01:43 A hand screws the mounting bracket for the camera onto the wall, then slides the camera onto it until it clicks. This demonstrates the initial steps for separate camera installation.
- 01:43–01:49 A hand screws the solar panel mounting bracket onto the wall, then tightens the ball knob. This shows the installation of the separate solar panel bracket.
- 01:49–01:56 A hand attaches the solar panel onto its bracket and adjusts its angle for direct sunlight. This completes the separate solar panel installation and reiterates the importance of sunlight.
- 01:56–02:02 A hand plugs the solar panel cable into the charging port on the back of the camera. This connects the separated camera and solar panel, completing the electrical setup for this option.
- 02:02–02:07 A hand wraps the excess cable around the cable organizer on the back of the separately mounted solar panel. This demonstrates cable management for the separated installation.
- 02:07–02:13 A final shot of the fully installed WYZE Solar Cam Pan system, now with "maintenance-free solar charging." This is a celebratory shot of the completed installation and reiterates the main benefit.
- 02:13–02:17 Brand logo "WYZE ALWAYS WONDER" on a black background, with text "WYZE SOLAR CAM PAN NOW AVAILABLE ON TIKTOK SHOP." This serves as a brand closing and call to action.
# Ad summary
This ad features a person showing off the Wyze Solar Cam Pan. They mount the camera on a tree and talk about the solar panel, 360 degree panning, AI tracking and 2k resolution.
# Brand positioning
Wyze is presented as a company that offers innovative and hassle-free smart home security solutions. The brand is positioned as a provider of high-quality cameras that address common consumer pain points such as battery life issues. Wyze aims to occupy a space in the consumer's mind as a reliable and user-friendly option. The brand offers value by pushing against the norm of inconvenient camera maintenance.
# Product
The Wyze Solar Cam Pan is a smart home security camera with a built-in solar panel for continuous charging. It addresses the issue of dead batteries and the inconvenience of manual charging. It’s designed for anyone seeking a hassle-free security solution that never dies and is easy to use. Key features include a solar panel that maintains battery life, even on cloudy days, a 360-degree panning capability, AI for tracking people, and 2K resolution for sharp images. It mounts easily, and after initial setup, can be forgotten, implying long-term reliability and ease of use. The ad also emphasizes that Wyze offers free 30-day returns and a discount code 'WELCOMED10' for 10% off, lowering purchase barriers.
# Visual style
The ad has a casual, user-generated content (UGC) feel with natural lighting. The editing style involves static shots and smooth transitions, giving it a polished but authentic appearance. The pacing is consistent, which helps to maintain viewer engagement. The visuals are timed to match the speaker's points, supporting a clear and concise message.
# Hooks
Spoken: Okay, I'm obsessed with this camera.
Text overlay: Okay, I'm obsessed with this camera.
Visual: 00:00–00:02 The camera is shown in someone's hand in front of a tree in natural light. In the background, there are homes and trees. The camera is all white and square. It has a small square lens on the front and a solar panel on top. The sky is blue and there are bare tree limbs visible.
# Funnel stage
Middle of funnel (Consideration)
# Pain points
The most central pain point addressed is the hassle of dealing with security camera batteries that die quickly. The ad highlights the frustration of having to constantly recharge cameras, symbolized by the line, “the battery would die, and suddenly I'm climbing a ladder with a charger like an idiot.”
# Value propositions
- The Wyze Solar Cam Pan is the first one where I'm like, wait, this is what it should be
# Benefits
- The camera just never dies
- It hasn't even come close to dipping below 50% battery life
- I've honestly forgotten it exists in the best way
- Free 30-day returns
# Features
- Solar panel is built in
- Uses a motor to pan 360 degrees
- Uses AI to track people
- 2K so it's actually sharp
# Call to action
Use code WELCOMED10 at checkout for 10% off your purchase.
# Social proof
- “Okay, I'm obsessed with this camera.” – Male 1 (Customer)
- “The Wyze Solar Cam Pan is the first one where I'm like, wait, this is what it should be.” – Male 1 (Customer)
- “I've honestly forgotten it exists in the best way” – Male 1 (Customer)
# Point of view
- Customer 100% – The ad is told entirely from the perspective of a user, showing their experience with the product.
# Storyline
- 00:00–00:02 The speaker expresses initial enthusiasm for the camera
- 00:02–00:09 The speaker recalls their past frustrations with security cameras, where batteries died quickly, forcing them to climb a ladder to charge them.
- 00:09–00:15 The speaker introduces the Wyze Solar Cam Pan and contrasts it with past experiences, suggesting it's what security cameras should be.
- 00:16–00:26 The speaker highlights the built-in solar panel, emphasizing that the camera never dies and highlighting that this model never drops below 50% battery life.
- 00:27–00:34 Continuing to list features, the speaker notes that the camera uses a motor to pan 360 degrees, and leverages AI to track people.
- 00:34–00:37 The speaker adds that the camera is 2k, and therefore sharp.
- 00:38–00:44 The speaker shares personal experience, highlighting that a month ago, they pointed the solar panel to the sky and have forgotten that the camera exists.
- 00:45–00:49 The speaker highlights that they offer free 30-day returns.
- 00:49–00:54 The speaker provides a 10% discount code for first time buyers.
# Ad summary
This ad showcases the WYZE Solar Cam Pan, highlighting its key features like maintenance-free solar charging, 360° x 70° pan-tilt range, AI-powered person tracking, integrated spotlight, and 2K HD resolution color night vision. The ad emphasizes the product's functionality and value, promoting it at a price of $79.98.
# Brand positioning
WYZE presents itself as a provider of innovative, user-friendly smart home security solutions. The brand appears to focus on accessible technology, offering products like the Solar Cam Pan that combine advanced features with ease of use. The brand's positioning emphasizes convenience, reliability, and affordability, making home security accessible to a broad audience. WYZE seems to be challenging traditional security systems by offering self-installed, technologically advanced solutions that don't require professional monitoring or complex setups.
# Product
The WYZE Solar Cam Pan is a wireless outdoor security camera that is designed for ease of use and comprehensive coverage. It features a solar panel for maintenance-free solar charging, ensuring continuous operation without the need for manual battery replacements. The camera has a 360° x 70° pan-tilt range, providing a wide field of view, and AI-powered person tracking to focus on relevant movements. It also includes an integrated spotlight for enhanced visibility and 2K HD resolution color night vision for clear imaging in low-light conditions. This product is for homeowners seeking a hassle-free, technologically advanced security solution that offers comprehensive surveillance without the need for frequent maintenance.
# Visual style
The ad features a product-focused, studio-shot aesthetic. The image is well-lit and professionally composed, with the product as the primary focus against a blurred background. The visual motifs include clean lines and clear typography to emphasize key features and benefits. There are drop shadows behind some of the visual elements to add depth. The overall impression is polished and informative, designed to quickly convey the product's value proposition.
# Hooks
Headline: only
$79.98
# Funnel stage
Middle of funnel (Consideration)
# Pain points
The ad addresses the pain point of frequent maintenance and battery replacements commonly associated with wireless security cameras.
# Value propositions
- The WYZE Solar Cam Pan combines advanced security features with the convenience of maintenance-free solar charging, providing homeowners with a reliable and hassle-free surveillance solution.
# Benefits
- Continuous operation without manual battery replacements.
- Wide field of view.
- Focus on relevant movements.
- Enhanced visibility.
- Clear imaging in low-light conditions.
# Features
- Maintenance-Free Solar Charging
- 360° x 70° Pan-Tilt Range
- AI-Powered Person Tracking
- Integrated Spotlight
- 2K HD Resolution Color Night Vision
# Call to action
None used.
# Social proof
- None used.
# Point of view
- Brand: The brand communicates the product features and price.
# Storyline
- The ad opens with a close-up of the WYZE Solar Cam Pan mounted on a wooden wall, immediately showcasing the product in a realistic outdoor setting. The intention is to familiarize the viewer with the product's design and its intended use environment. The viewer experiences this from an observer perspective.
- The ad emphasizes key features such as "Maintenance-Free Solar Charging", "360° x 70° Pan-Tilt Range", "AI-Powered Person Tracking", "Integrated Spotlight", and "2K HD Resolution Color Night Vision" through icons and text. The intention is to quickly communicate the product's core benefits and functionality. The viewer experiences this from a brand perspective.
- The ad highlights the product's price, "only $79.98", which aims to create a sense of value and affordability. The intention is to encourage immediate purchase by presenting a compelling price point. The viewer experiences this from a brand perspective.
# Ad summary
The ad showcases a Wyze Solar Cam Pan, highlighting its key features such as maintenance-free solar charging, 360° x 70° pan-tilt range, AI-powered person tracking, and 2K HD resolution color night vision.
# Brand positioning
Wyze is presented as an innovative tech company focused on home security solutions. The brand is positioned as offering accessible and user-friendly security devices that integrate seamlessly into modern homes. By focusing on solar-powered, maintenance-free technology, Wyze appeals to customers seeking convenience and environmental consciousness. The brand emphasizes simplicity and ease of use, making home security accessible to a broad audience. The brand promotes a lifestyle of security and peace of mind, allowing customers to protect their homes and loved ones without the complexities of traditional security systems. Wyze competes by offering advanced features at competitive prices, challenging the notion that comprehensive security solutions require expensive, complicated installations.
# Product
The featured product is the Wyze Solar Cam Pan, a wireless outdoor security camera designed for comprehensive home surveillance. It operates on solar power, ensuring maintenance-free charging and continuous operation. The camera offers a 360° x 70° pan-tilt range, allowing users to remotely adjust the viewing angle for complete coverage. AI-powered person tracking enables the camera to automatically detect and follow human movement within its field of vision. The camera captures video in 2K HD resolution with color night vision, providing clear and detailed footage day and night. These features provide users with reliable, versatile, and high-quality home security, making it an ideal choice for those seeking an easy-to-use and effective surveillance solution.
# Visual style
The ad has a clean, modern aesthetic with a focus on product clarity and functionality. The shot is professionally lit, with soft, diffused light that eliminates harsh shadows and highlights the product's form. The color palette is simple and neutral, dominated by white, gray, and blue tones, creating a sense of trust and sophistication. The use of clean lines and minimal background clutter helps to maintain focus on the product, while the icons are simple and clean. The overall style is intended to be both informative and visually appealing, emphasizing the product's advanced features and user-friendly design.
# Hooks
Headline: $79.98
# Funnel stage
Middle of funnel (Consideration)
# Pain points
The central pain point is the hassle of managing the power supply for outdoor security cameras. The advertisement addresses this by highlighting 'Maintenance-Free Solar Charging,' indicating a solution that eliminates the need for manual battery replacements or wiring.
# Value propositions
- Maintenance-Free Solar Charging for continuous operation
- 360° x 70° Pan-Tilt Range for complete coverage
- AI-Powered Person Tracking for automatic detection
- 2K HD Resolution Color Night Vision for clear and detailed footage
# Benefits
- Continuous operation without manual charging
- Complete coverage with remote viewing angle adjustment
- Automatic detection and tracking of human movement
- Clear and detailed footage day and night
# Features
- Maintenance-Free Solar Charging
- 360° x 70° Pan-Tilt Range
- AI-Powered Person Tracking
- 2K HD Resolution Color Night Vision
# Call to action
None used.
# Social proof
- None used.
# Point of view
- Brand: Showcases the Wyze Solar Cam Pan and its key features.
- Customer: The features shown speak to the customer.
# Storyline
- The ad begins by showcasing the Wyze Solar Cam Pan mounted outdoors, providing a real-world context for its use. This sets the scene and immediately introduces the product to the audience, showing them where and how it can be implemented. The perspective is from the brand, showing the product in its intended environment.
- The image then highlights the product's key specifications and features, emphasizing its solar charging capability, wide pan-tilt range, AI-powered person tracking, and high-resolution night vision. This educates the audience on the technical aspects and unique selling points of the camera. This portion is told from the brand's perspective, listing features and functionality.
- The ad concludes by visually demonstrating the camera's pan and tilt range with white curved arrows around the product, helping the customer visualize how the camera operates. This provides a practical understanding of the camera's monitoring capabilities and enhances the appeal. The viewer is experiencing the demonstration from a potential customer's point of view.
# Ad summary
This image ad showcases the Wyze Solar Cam Pan, emphasizing its smart, solar-powered, and powerful features. The ad highlights its unstoppable security powered by nature and includes several functional benefits, such as solar power, AI person tracking, easy installation, and 2K HD video. It also offers a direct call to action to buy now at a specific price.
# Brand positioning
Wyze is presented as a brand focused on providing smart, accessible home security solutions that integrate seamlessly into modern lifestyles. The brand emphasizes innovation and eco-friendliness by promoting products like the solar-powered security camera. Wyze positions itself as a provider of technologically advanced security solutions, offering features like AI person tracking and high-definition video at an affordable price point. It aims to empower consumers with easy-to-install and maintain security systems, aligning with values of convenience, sustainability, and technological integration.
# Product
The featured product is the Wyze Solar Cam Pan, a smart home security camera designed for outdoor use. It is a solar-powered camera, emphasizing its eco-friendly nature. The camera features AI person tracking, which enhances its ability to monitor and detect human presence. It offers easy installation. The camera records video in 2K HD, providing clear and detailed footage. The Wyze Solar Cam Pan is presented as a comprehensive, user-friendly security solution that combines advanced technology with sustainable power, making it ideal for homeowners seeking a reliable and environmentally conscious security option.
# Visual style
The ad features a clean and modern visual style, blending product photography with graphic elements to highlight key features. It uses a semi-realistic outdoor setting to suggest a practical use case, while also maintaining a high level of polish and focus on the product itself. The strategic use of lighting and color gradients enhances visual interest, contributing to stop power in the feed.
# Hooks
Headline: UNSTOPPABLE SECURITY. POWERED BY NATURE.
# Funnel stage
Bottom of funnel (Conversion)
# Pain points
The ad addresses the need for reliable home security, specifically in outdoor settings, without requiring complex installation or constant maintenance.
# Value propositions
- Solar Powered: Eco-friendly and reduces reliance on traditional power sources.
- AI Person Tracking: Enhances security monitoring by accurately detecting human presence.
- Easy Installation: Simplifies the setup process, making it accessible to a wide range of users.
- 2K HD Video: Provides high-quality video footage for clear and detailed surveillance.
# Benefits
- Unstoppable Security
- Smart
- Solar
- Powerful
# Features
- Solar Powered
- AI Person Tracking
- Easy Installation
- 2K HD Video
# Call to action
BUY NOW $79.98
# Social proof
- None used.
# Point of view
- Brand: The brand uses the bold headline, product description, and feature callouts to communicate the product's benefits and encourage immediate purchase, aiming to inform and persuade the viewer.
# Storyline
- The ad opens with a bold declaration of "UNSTOPPABLE SECURITY. POWERED BY NATURE," immediately conveying the product's core benefit and power source. The brand is telling the viewer that the Wyze Solar Cam Pan provides top-tier security in an eco-friendly way.
- The product name is displayed alongside key functional descriptors such as "SMART. SOLAR. POWERFUL." The brand is highlighting key value propositions in the form of simple attributes.
- Visual callouts appear to the right of the product, highlighting individual features and benefits such as solar power, AI person tracking, easy installation, and 2K HD video. The brand is telling the viewer that these are the most important, differentiating features of the product.
- The ad concludes with a direct call to action: "BUY NOW $79.98," encouraging immediate purchase with a clear price point. The brand is urging viewers to convert with a time-sensitive offer.
# Ad summary
This ad features a content creator reviewing the Wyze Solar Cam Pan outdoor security camera. The creator highlights the fact that, unlike other wireless security cameras, the Wyze camera's battery has never dropped below 80% in three months of winter use due to its solar panel. He also mentions that it's a panning camera, so it follows people and provides useful footage.
# Brand positioning
Wyze presents itself as a reliable brand offering smart home products that simplify users' lives. The brand's solar-powered security camera is positioned as a hassle-free solution, eliminating the common problem of battery drain in traditional wireless cameras. This functional benefit aligns with a lifestyle of convenience and security, targeting consumers who seek dependable and user-friendly smart home solutions.
# Product
The Wyze Solar Cam Pan is an outdoor wireless security camera featuring a built-in solar panel for continuous charging. It boasts 360-degree panning capabilities to follow movement and capture useful footage. The camera is designed to be easy to install and maintain, requiring minimal user intervention once set up. Its primary USP is the combination of wireless convenience with solar-powered longevity, addressing the pain point of frequent battery replacements or charging needed for other wireless security cameras. The product is ideal for homeowners seeking a reliable and low-maintenance security solution that can withstand various weather conditions.
# Visual style
The ad has a casual, UGC feel, similar to content found on social media platforms. The production quality is typical of user-generated content, with natural lighting and handheld camera work. The editing style features quick cuts and static shots. The overall aesthetic suggests authenticity and relatability, aiming to connect with viewers seeking practical solutions. The pacing is quick, maintaining a modern, upbeat tone.
# Hooks
Spoken: 00:00–00:07 I've bought security cams before and it's always the same story. The battery dies, I forget, then I miss something important.
Text overlay: Reply to Kerry Wranglers' comment / Just Got 3 yesterday / waiting on sd cards today / It's about time 🧐
Visual: 00:00–00:02 The shot shows a person holding a Wyze Solar Cam Pan on a brick wall. The camera is white with a black lens, and on top is a small solar panel. There are trees and buildings in the background. A comment is pinned to the top of the screen. The camera is being held at arm’s length in front of the person, so the angle is slightly from below. The natural lighting is soft and even. The product and its mount take up much of the frame. / 00:02–00:05 The person touches the black solar panel. The person rotates the device, still attached to the house. / 00:05–00:07 The camera angle shifts to the solar panel, which takes up more of the frame.
# Funnel stage
Middle of funnel (Consideration)
# Pain points
The ad addresses the pain point of battery drain in traditional wireless security cameras. "I've bought security cams before and it's always the same story. The battery dies, I forget, then I miss something important."
# Value propositions
- Eliminates the common problem of battery drain in traditional wireless cameras
- Provides comprehensive surveillance due to the 360-degree panning feature
- Offers a set-it-and-forget-it solution for home security
# Benefits
- Battery never drops below 80%
- You actually get useful footage
- Stops you from having to think about it
# Features
- Solar-powered security camera
- 360-degree panning
- Motor that pans the camera 360 degrees and follows people
# Call to action
None used.
# Social proof
- "The solar panel is incredible. I've had it out here for three months in the winter and it's never dropped below 80% battery life" – Male 1 (Content creator)
- "I mounted it, aimed it at the sun, and I've basically stopped thinking about it, which is the best review I can give a security camera" – Male 1 (Content creator)
# Point of view
- Customer 100% – The entire ad is told from the POV of a content creator who presents as a customer.
# Storyline
- 00:00–00:01 The ad starts with a shot of a white outdoor security camera mounted on the side of a brick house.
- 00:00–00:07 00:00–00:07 The creator begins by stating that he has bought security cameras before but has always had the same problem: the battery dies and he forgets to recharge them, causing him to miss something important. The viewer is put in the position of someone who has experienced the same problem.
- 00:07–00:13 00:07–00:13 The creator states that the Wyze Solar Cam Pan is the first camera that feels like it works correctly. The viewer is put in the position of someone who has finally found a solution to their problem.
- 00:14–00:25 00:14–00:25 The creator notes that the solar panel is incredible, stating that in the three winter months he has had the product, the battery has never dropped below 80%. He adds that the camera just sits there and charges itself, and works fine even on cloudy days. The ad establishes the key functional benefit of continuous solar charging and alleviates concerns about battery life. The viewer is put in the position of someone hearing about a product that takes the hassle out of owning a wireless camera.
- 00:25–00:34 00:25–00:34 The creator mentions that the camera isn't stationary. It pans 360 degrees and follows people, leading to more useful footage. This underscores the camera's advanced features, assuring the viewer that they can capture comprehensive surveillance.
- 00:35–00:43 00:35–00:43 The creator concludes that he mounted the camera, aimed it at the sun, and stopped thinking about it, which is the best review he can give a security camera. This emphasizes the product's ease of use and reliability.
# Ad summary
An ad for the Wyze Solar Cam Pan security camera. It highlights the product features and a price promotion of $79.98.
# Brand positioning
Wyze is presented as an innovative tech company that produces home security products. The ad highlights that the Wyze security camera is a modern, advanced, and convenient home security solution. The brand aims to occupy a space in the consumer's mind as a provider of smart home technology that is both user-friendly and affordable. The company promotes a lifestyle of safety and peace of mind. Wyze ignores category norms that security systems have to be complicated and expensive.
# Product
The Wyze Solar Cam Pan is a wireless home security camera with a solar panel for maintenance-free charging. The camera features a 360° x 70° pan-tilt range. The camera has AI-Powered person tracking and an integrated spotlight. It provides a 2K HD resolution with color night vision. The ad is telling the viewer that this product is worth trying because it provides comprehensive and easy-to-use home security features at a low price. The product addresses the barrier of installation and maintenance.
# Visual style
The ad has a clean, modern, and informative visual style. The production quality is high, with professional product photography and graphic design. The image treatment uses soft lighting and natural colors to create a warm and inviting feel. The typography is clean and legible. The overall visual aesthetic is designed to be eye-catching and informative, making it easy for viewers to quickly understand the product's features and benefits.
# Hooks
Headline: only
$79.98
# Funnel stage
Middle of funnel (Consideration)
# Pain points
The ad is solving the problem of limited camera viewing angle by offering a wide 360° x 70° pan-tilt range.
# Value propositions
- The ad emphasizes the affordability of the product by highlighting a specific price of $79.98.
# Benefits
- Maintenance-Free
- AI-Powered Person Tracking
- 2K HD Resolution Color Night Vision
# Features
- Maintenance-Free Solar Charging
- 360° x 70° Pon-Tilt Range
- AI-Powered Person Tracking
- Integrated Spotlight
- 2K HD Resolution Color Night Vision
# Call to action
None used.
# Social proof
- None used.
# Point of view
- Brand: Throughout the entire image, the brand is presenting its product and its benefits.
# Storyline
- The ad opens with an image of the Wyze Solar Cam Pan mounted on the side of a building, showing the product in a home environment. This placement shows how the product is used in a real-world setting from the brand's perspective.
- Next, the camera's key features are highlighted with icons and text callouts. The brand is presenting the camera's capabilities in a way that is visually appealing and easy to understand.
- Finally, the ad focuses on the price of the Wyze Solar Cam Pan to encourage the viewer to take action. The brand is highlighting the product's affordability as a purchase incentive.
How Other Technology Brands Advertise on Meta
Peer brands in Motion's library — click any brand to see their creative strategy, live ads, and AI breakdowns.